Before you can do the import, answering the following questions will help you complete your data import.
- What’s the source of your data?
- What are you trying to do in CRM?
- What do you want to import?
What’s the source of your data?
Import from another CRM
You’ll need to do the following steps:
- Export the tables from the source CRM into a spreadsheet per module, ensure you have the IDs.
- Ensure you add Parent IDs to Child spreadsheets, use vlookups if required.
- Optional – Export the tables from Zoho’s destination modules, clear the data to create import templates, leave the column headers.
- Optional – Copy and Paste the data into the Zoho import templates you have created.
- Use the Zoho migration wizard to add the data to the CRM.
Import from an improvised spreadsheet database or generic list
You’ll need to do the following steps:
- Split the data into several spreadsheets, one for each module you want to import into.
- Add Parent IDs to Child spreadsheets, use vlookups if required.
- Optional – Export the tables from Zoho’s destination modules, clear the data to create import templates, leave the column headers.
- Optional – Copy and Paste the data into the Zoho import templates you have created.
- Use the Zoho migration wizard to add the data to the CRM.
What are you trying to do in CRM?
Import new records
Use the migration wizard to import new records into the CRM.
Update existing records
Use the Import feature from each module. Manually import parent modules first if you’re updating more than one module.
Update existing and create new
Use the Import feature from each module. An option is available to match existing records using the IDs, any non-matches and a new record is created. Import parent modules first; otherwise, the new records could become orphans.
What do you want to import?
Non-customers or only one contact per organisation
You need to import into the Leads module. See my video on Zoho CRM Leads.
Multiple contacts per organisation or customers
Import data into two modules, the Accounts (Organisation) and the Contacts. You’ll need to import two spreadsheets, one for each.
Organisations with contacts and Sales Opportunities
You’ll need to import three spreadsheets, the Accounts, Contacts and Deals modules. Note, the Deals module contains the ID of both the Contact and Account.
Other data
Import to the other modules directly. Map the parent IDs to the importing spreadsheet – this may mean you have to export the parent spreadsheets and use vLookups to get the parent IDs onto the importing spreadsheet first.

Exporting data from your original database
If you have the data in a source CRM or database, you’ll need to get it out in a format which can be manipulated. The format of data you want is a spreadsheet. You can export the data from your source system into a CSV file, but they are usually better suited to the import process. If you can only export to CSV, copy and paste the data into a standard spreadsheet format afterwards like XLS or XLSX etc.
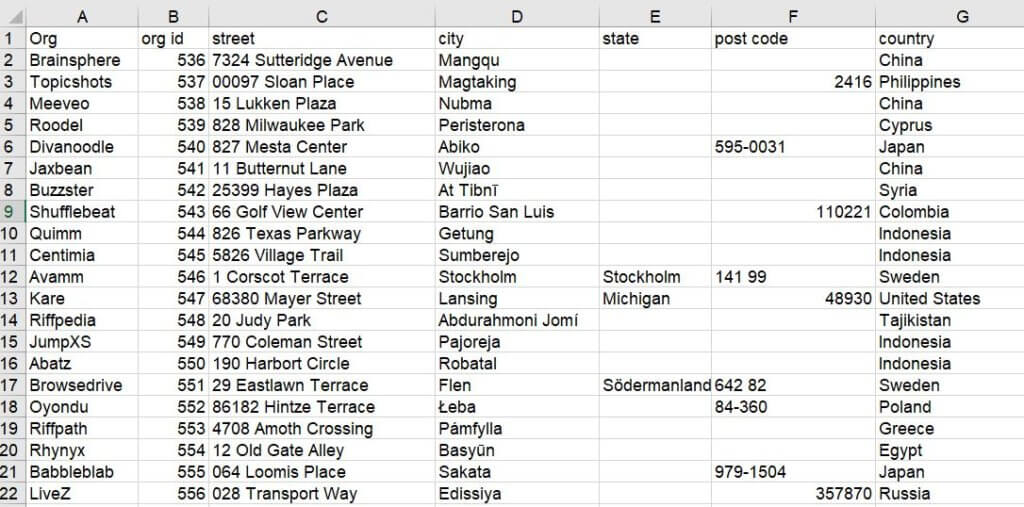
In the source system, you’ll need as many fields as possible. These will form columns in your spreadsheet output. In the example we’re using, we want all the Contact fields and all the Organisation fields. If you get an ID column, then this is useful when linking the tables for the import. Make sure you have a field which exists on both Contacts and Accounts export spreadsheets. In this example, it is the Organisation name we will be using on the Contacts spreadsheet.
You need unique IDs for all records
I need to explain some basic database theory before I can discuss the import process. That’s because when you import data, such as multiple contacts linked to an organisation, you need to import two sets of information – the contacts list and the organisation list.
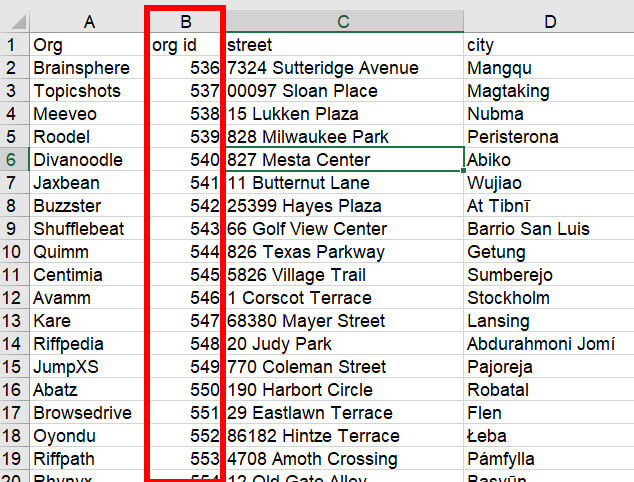
The theory is straight forward. Let’s use the example of multiple contacts linked to a single organisation. Each list of records in both tables need a unique value; this usually means an ID column in each list. In the Organisation list, each Organisation needs a unique ID. This ID could be anything. If your source data gives you a unique ID, you can use that, see below for an example of the IDs on an Organisation list.
When you import a list of new records and specifically Organisation records in Zoho CRM, you can import the ID column too. This will then be replaced by Zoho’s own ID values once it’s in the CRM.
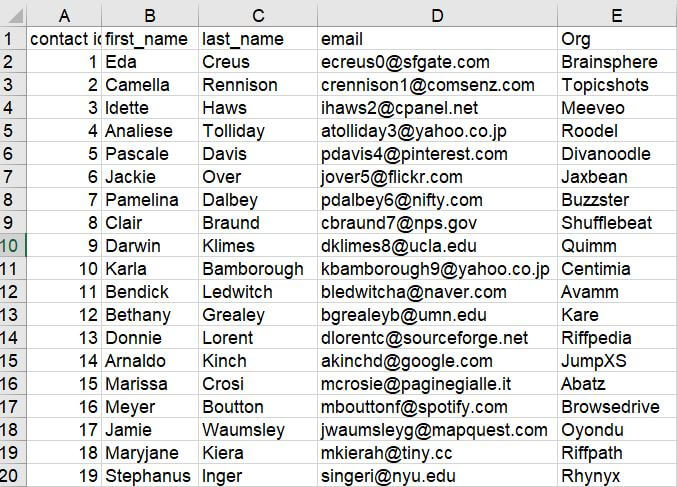
The Contacts import will also need its own ID column with unique values for each Contact. Even if all the records are unique, you still need a column with a unique value for the import.
So now you have two separate lists for importing. The problem you have is the two spreadsheets aren’t linked in any way.
The unique values in the ID column are known as keys in database terminology. These keys need to be used to link the spreadsheets together.
Making IDs/database keys for your import
To import records into Zoho CRM, you’ll need a database key for each record. If your source database already has a unique value for each row of the exported spreadsheet, then use that, if not, then read below on how to make your own database keys for the import process into Zoho CRM.
Each record in the source database has a unique ID, and this could simply be a row in a spreadsheet or an actual record in the database. When importing fresh records, you will have the chance to create your own IDs or use the one from your data source.
To create a new ID / key for each unique line on your spreadsheet, follow these steps:
- Create a new column to the right of the unique name of the record; in our example, it will be the Organisation Name.
- Add a number, usually “1” in the first cell of this column.
- In the cell directly below it write 2.
- Write 3 in the next cell below the 2.
- Select all three cells and drag the little square in the corner of the highlighted cells down the entire column for all the rows in the spreadsheet which contain data. This gives you a sequential list of unique numbers for that spreadsheet, i.e. your IDs / Keys.
Linking spreadsheets
Zoho CRM uses the ID / Key field to link tables together in order to import the data correctly and not create orphan records.
We need to be aware of the general database structure and therefore parent tables to know how each spreadsheet links together.
The parent table theory – linking records together
A parent table is a table which exists above another in a hierarchy. Don’t confuse this with parent records which is a hierarchy of specific records in the table. The child table will have the same ID / Key column as it’s parent table(s). This is to create a relationship between the modules.
Our example is an Organisation having many Contacts. This means the Organisation table is the parent table, and the Contact is the child table. This gives structure to our importing process as the parent table is always imported first, the ID/key on the parent table also exists in the child table and this allows the importing process to link the records together.
For the import process to work, we need to have the Organisation ID/key on the Contacts import spreadsheet. This is because the import wizard looks to join the Contacts with the Organisations. If the Organisation name is on both the Organisation spreadsheet and the Contacts spreadsheet, you can use this to identify what Organisation ID/Key to use and show it on the Contact spreadsheet. If you think this is tedious to do manually, it is. However, spreadsheets make this job incredibly easy and straightforward.
The method to do this in a spreadsheet is called vLookups, and I’ll explain how to use it below.
vLookups – Adding IDs from a parent record onto a child record
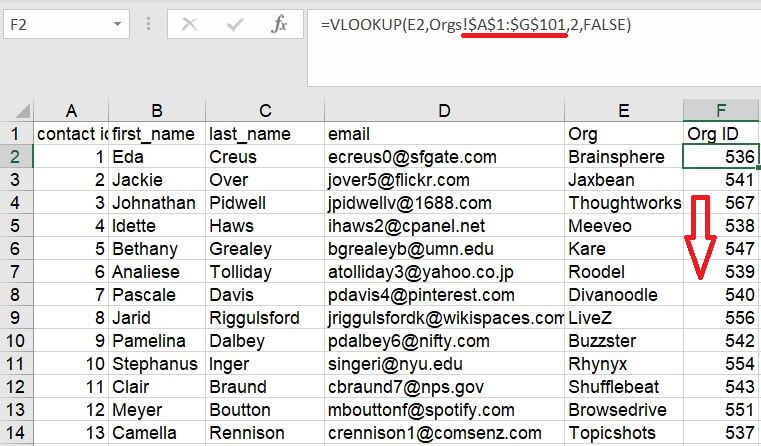
To find out parent IDs and add them to our Child records, we need to use the Excel formula called vLookup.
The vLookup formula you need to use in your spreadsheet is:
=VLookup(Lookup_Value, Table_Array, Col_Index_Num, Range_Lookup)
Lookup_Value – This is the value you wish to match on in another table, in our example it is the Organisation name in the Contacts table, we use this value to find the Org ID in the Organisation table.
Table_Array – This is the table you want to find the data in, in our example, it’s the Org table. The first column in the range lookup must be the column that contains the value you’re matching in the Lookup_Value. You may have to rearrange your spreadsheet so that the ID field you want to find is to the right of the first column selected in the array.
Col_Index_Num – This is the location the value you want to find is to the right of the first column in the array. It’s usually the number 1 or 2.
Range_Lookup – This is a misleadingly named part of the formula. What it means is, do you want an exact match of the value to be returned? Oddly it uses the word TRUE to mean not exact and FALSE to mean an exact match. We always want an exact match, so FALSE is what we’ll use.
It’s a good idea to make the tables you want to use the vLookup in as worksheet tabs rather than separate spreadsheets, at least until you have cleaned the data and are ready to import them as separate CSV files.
Don’t worry if you don’t understand it yet. I’ll provide an example below of how it works.
Step 1
Create a spreadsheet with the tabs for the different tables. In our example, we have two tabs one for the Contact and one for the Organisation.
Step 2
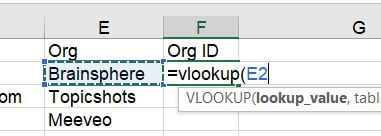
In the Contact tab, next to the column you want to match on, create a new column. Next to the cell you want to match on start typing
=vLookup(
This will tell Excel that you want to create a vLookup. After the first bracket, select the cell you want to match, our example is E2. Then add a comma to go to the next part of the formula.
Step 3
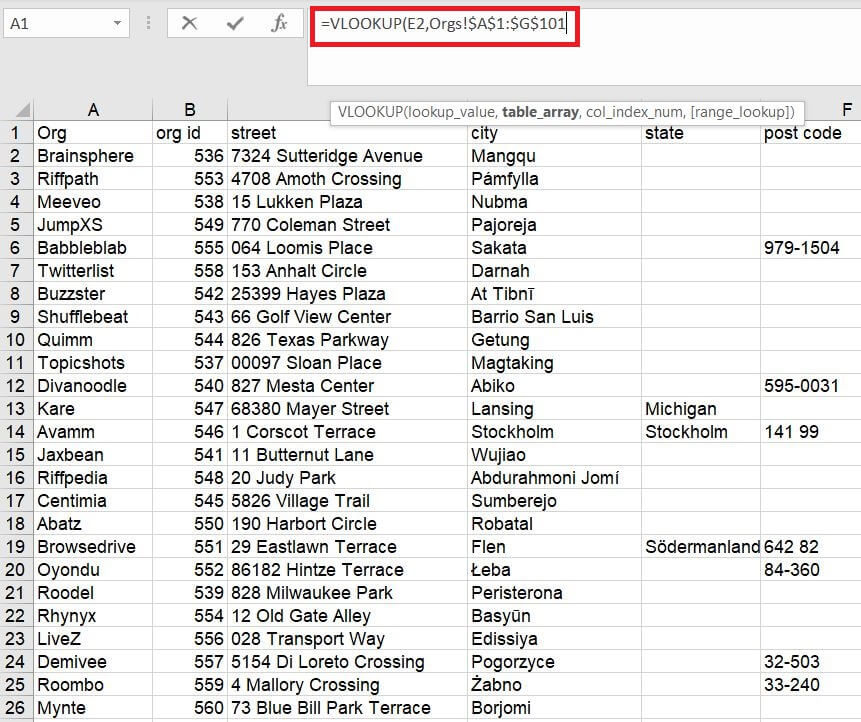
You then need to select the Table_Array. This is the organisation table in the org tab on the spreadsheet. Make sure that when you select the cells in the table, the first column contains the information you want to match. In our example, it is A1:G101, the name of the tab will automatically be added. It’s good practice to add the dollar symbol $ to the array you select. This prevents the array from moving when you copy and paste the formula into the other cells. This would look like this in our example $A$1:$G$101. Add a comma to go to the next part of the formula.
Step 4
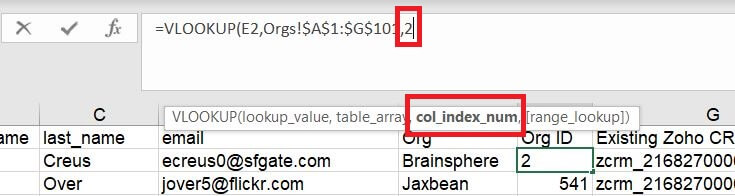
Select where the Org ID you want to bring back is located, we know it’s one column to the right of our Org name, so we write 2. Then add a comma to go to the next part of the formula.
Step 5
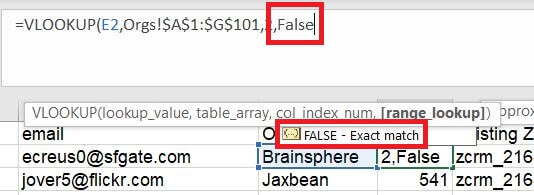
We want an exact match, so type FALSE. Then close the formula using a closing bracket. Hit enter when you’re done.
Step 6
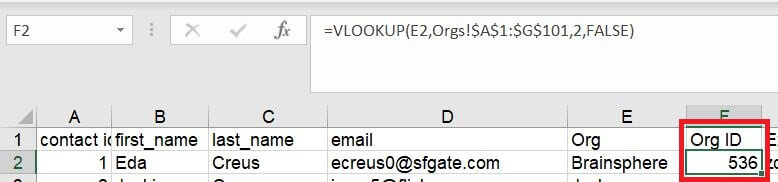
If you’ve done this correctly, you’ll get the Org ID back. Check it matches what you expected on the Organisation table.
Step 7
Copy the formula down to all the other cells in the same column. If you start getting some weird results or the word #N/A, then use the $ sign to lock your table arrays as mentioned above in step 3.
For more Excel wizardry check out Ablebits excellent blog!
Zoho CRM data – example with Zoho
The best practice CRM data structure is:
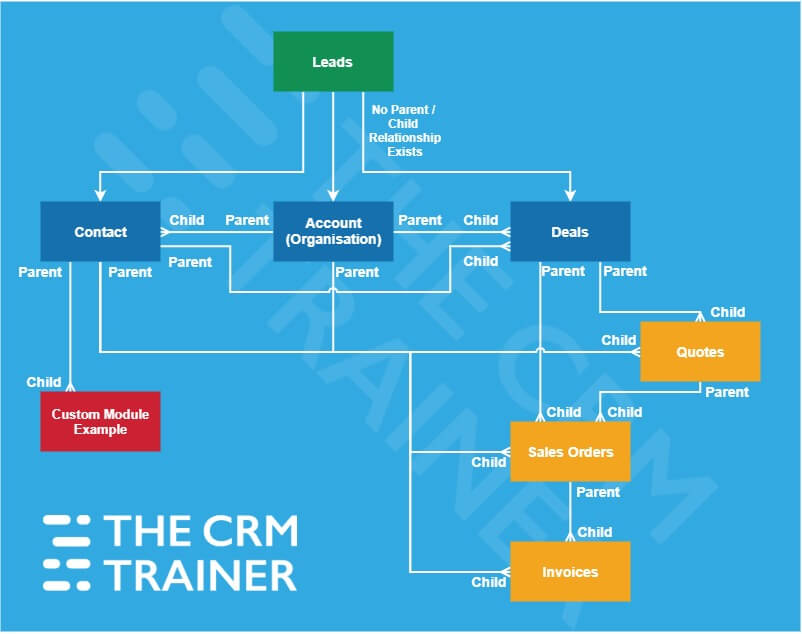
This diagram shows which modules connect to each other and therefore what the child module is and what the parent module is, this is shown on either end of each arrow. You can have multiple parent records to a module.
Importing new records into Zoho
Luckily if you’re importing brand new records (i.e. not updating existing ones), Zoho CRM’s import wizard handles the order in which the tables go in. You will, however, need to add both parent and child table spreadsheets to the import wizard, remember to ensure the parent ID is on the child record. In our example, this is the Organisation ID/Key on the Contact spreadsheet.
Import restrictions and considerations
- Make sure you have import permission for your user login. If you’re unsure, then it’s best to ask an Admin user. If you’re an Admin user, then you’ll most likely have permission.
- The Migration Wizard import files need to be in CSV format. If you worked on the files in a spreadsheet, you could save them as CSVs.
- File size can be a max of 4GB, and you can import up to 200 CSV files in each import.
- The migration wizard allows you to create new modules but resist the temptation to do this. It’s bad practice to build tables using the migration wizard. Use the builder instead, and you’ll have fewer problems down the line.
- If you have a checkbox field in the CRM you want to write to, use the word TRUE or 1 to give you a selected checkbox and the word FALSE or 0 for an unselected box.
- Certain characters don’t import because they can be used as field delimiters. Don’t include | or “or < or >.
- If you have values for a multi-select picklist field in your import spreadsheet, make sure to use the semicolon to separate the values.
- The import will skip records if you have mandatory fields in the CRM which are missing in the import file.
- Don’t leave blank rows between records in your import spreadsheets as this could be interpreted by the import wizard as the end of the spreadsheet.
Steps for importing Zoho CRM data using the Migration Wizard
Step 1
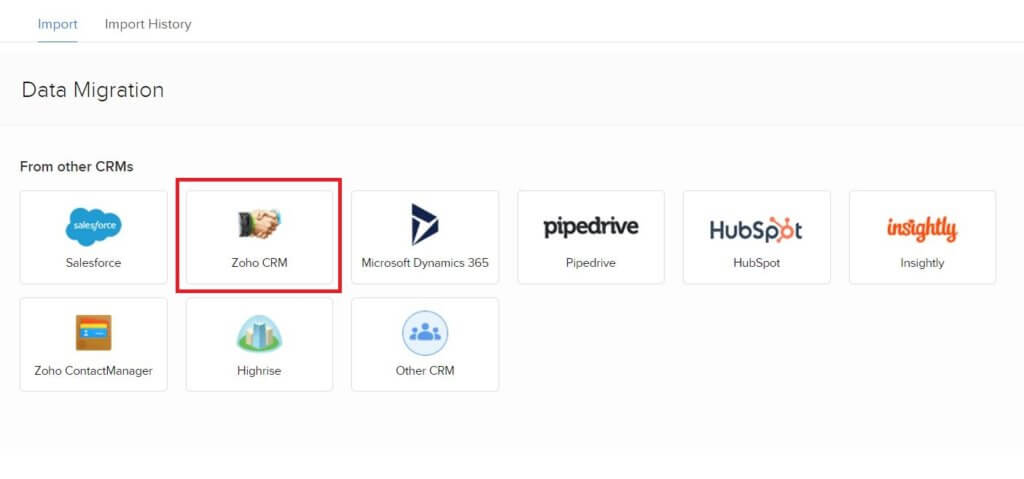
Go to Settings and select Data Import, then select Data Migration. Select the best option which matches your source location. If you can’t find a match, I suggest selecting Zoho CRM.
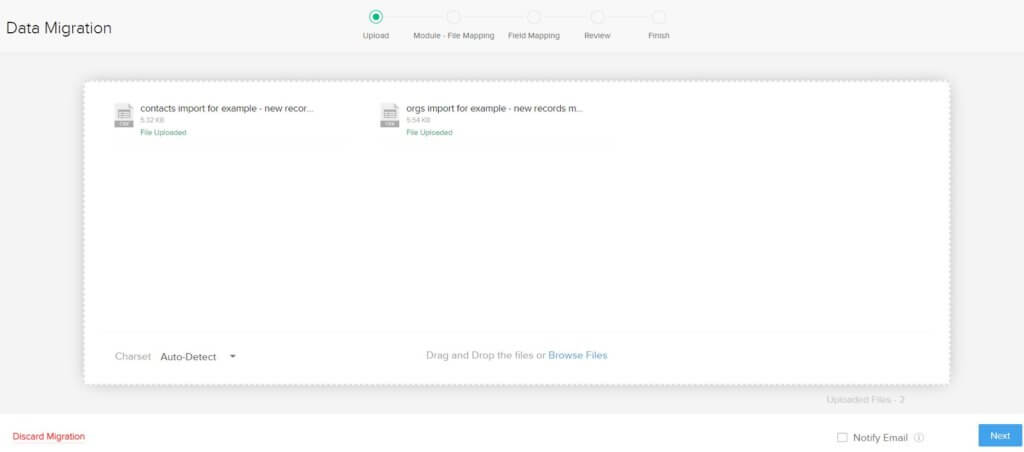
Step 2
Drag and drop or browse to the files you want to import. Remember to bring in both the parent and child tables. In our example, that’s both the Organisations and the Contacts. This must be in CSV file format. Select Next.
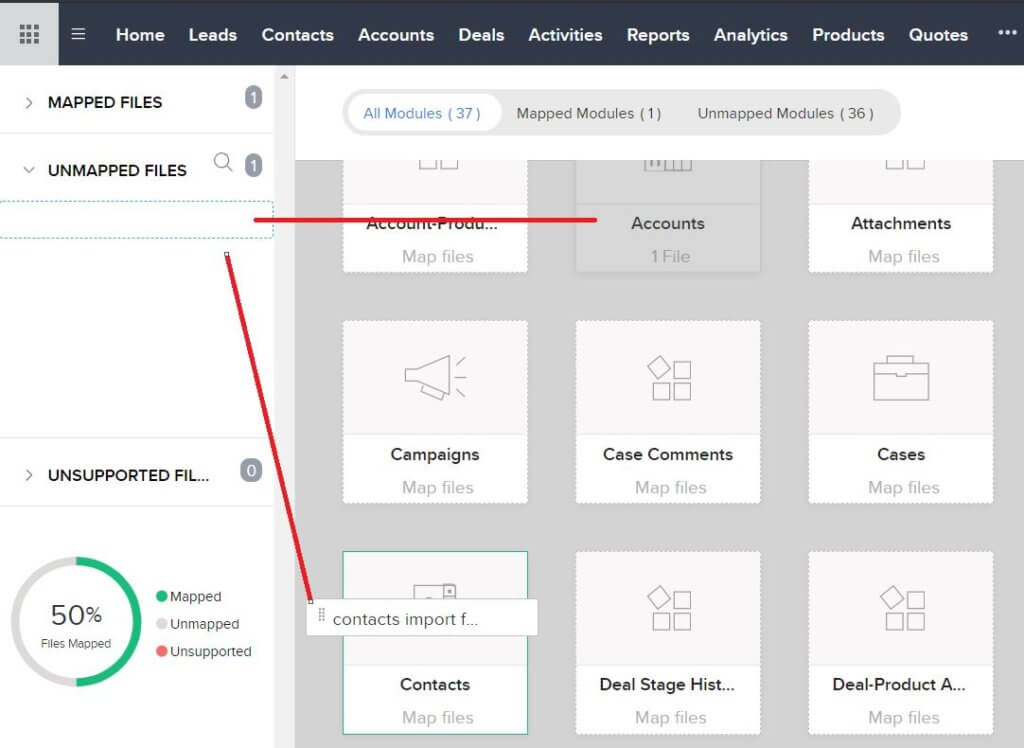
Step 3
If you have similarly named files that match the CRM tables, the system will automatically match the import file to the right table. If not you can drag the file onto the correct module icon to map it. Select Next.
Step 4
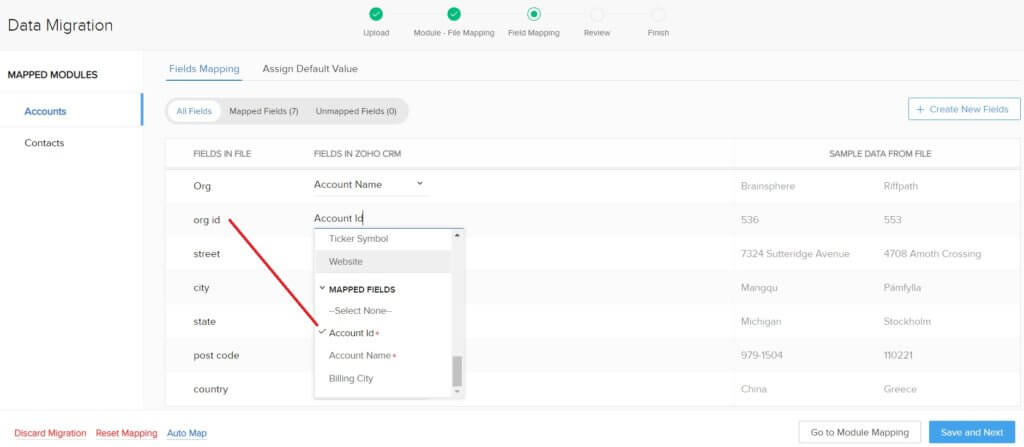
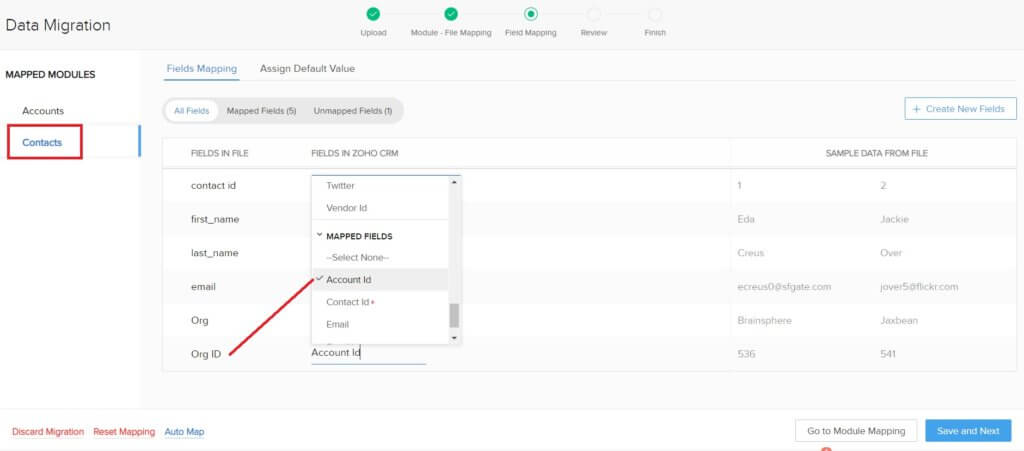
In the field mapping page, you need to match the columns in the spreadsheet with the fields in the CRM. Use the right-hand columns which show you the data in the files so you can be sure you’re matching it up.
Remember to map the ID field that you may have created. Make sure if you’re importing both a parent and child table (e.g. Organisations and Accounts), you also map the Organisation / Accounts ID field on the Contacts mapping page to the Organisation ID column. Press Next when you’re ready to select the next table for mapping the fields.
Step 5
You can also select default values for any field.
Step 6
Once you have all the fields mapped in all the tables, select Next.
Step 7
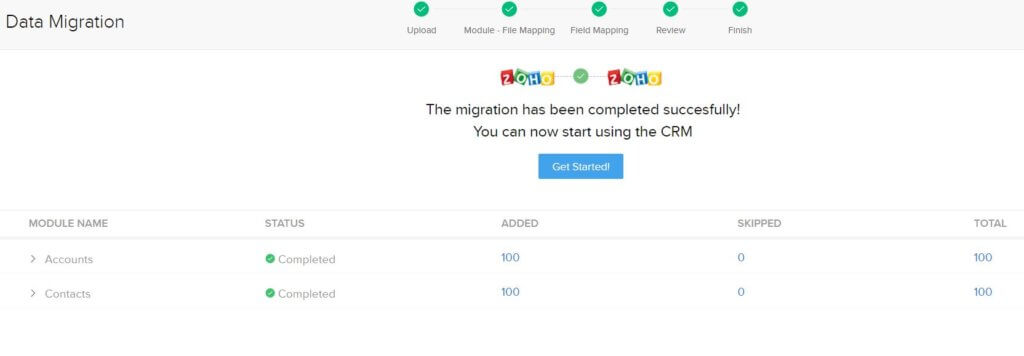
The review page allows you to see the status of the import. Select Start Migration.

Step 8
If the import is not what you expected or you made a mistake, it’s easy to undo the import and the records imported will be erased.
Step 9
After the import, you can see which records were imported and which weren’t for each module. This allows you to review the status of each unimported record and the reason why. It can then be exported, fixed and re-imported again.
Updating existing records
If you’re not creating any records in your import and just updating the existing data, you’ll first need to export the data into spreadsheets to work on them.
IMPORTANT: If you’re using Zoho CRM, once the data has been imported the first time, your original database IDs / Keys you used for the import process will have been overwritten and are replaced by Zoho IDs. You’ll need to export the data from the Zoho CRM to get the Zoho CRM keys, also known as ZCRM IDs. If you want to re-import the data, you’ll need to use these keys. Use the VLookups instructions above to add the ZCRM IDs to the new records you are importing.
For example, if you want to import new contacts against existing Organisations / Accounts, then you’ll need to export the Account module with the ID columns and use vlookups to add it to the new Contacts Import spreadsheet.
If you have less than 3000 records to export and update, you can use the export wizard. Note, don’t use a report and export to XLS, because you’re unlikely to get the keys which now already exist in the CRM.
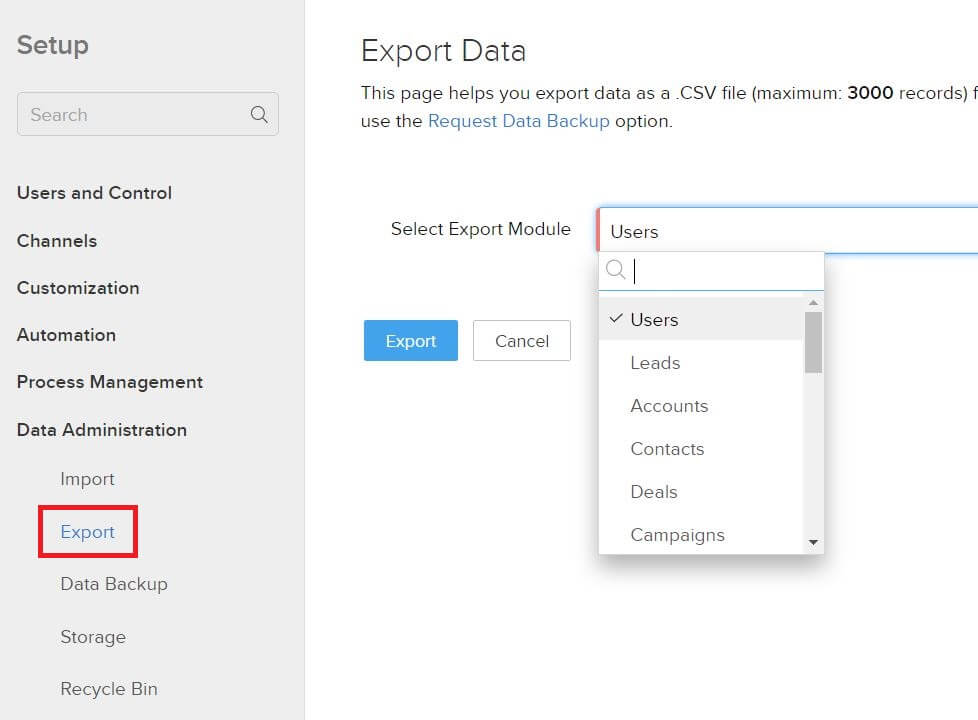
If you have more than 3000 records to export and update, you’ll need to use the data backup feature. You have two free data backups per month and can request additional ones if you need to. Follow the instructions on the data backup page to get the data.

If you need to filter the data after you’ve got the export, you can filter within a spreadsheet and remove any records you don’t want to change for the re-import.
If you did it correctly, the parent record IDs already exist in your exported spreadsheet, so don’t remove the parent ID columns. You can delete rows but be careful about removing columns.
When you re-import the data, don’t use the data migration wizard, this is only for adding new records. Instead, you’ll have to use the import button on each module page.
When importing the data, you’ll get the option of updating or adding new records or both, make sure you select the updating option to avoid creating duplicates. You’ll be able to match the records in your import spreadsheet with the existing records in the CRM using the ID fields. The ID fields name differs based on what module you’re importing to. The Organisation module will have the field Organisation ID, and Contacts will have the Contacts ID that you need to match up with your importing spreadsheet column.
Existing Records Import Steps
Step 1
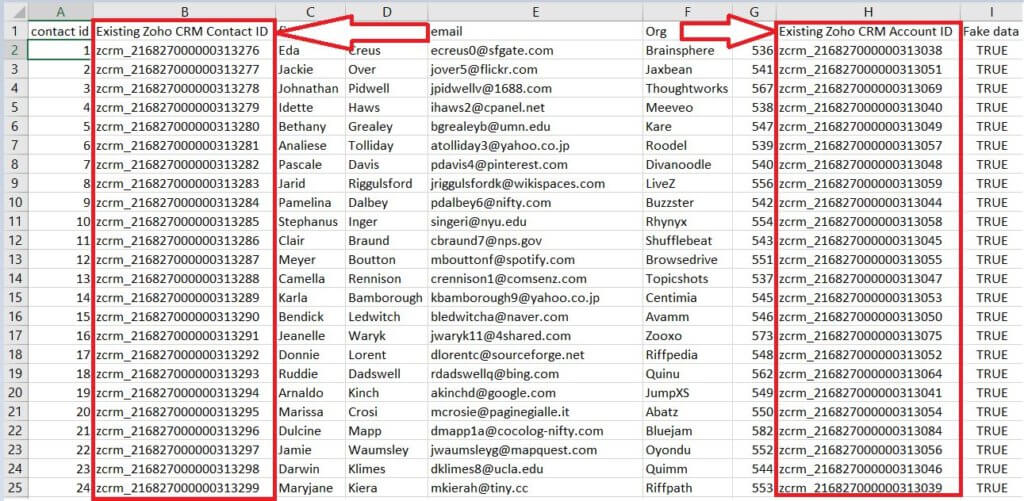
Export the data from the CRM and append parent record ID columns with the ZCRM IDs obtained with a vLookup if required. You may also need the existing record ZCRM ID too. In my example, I’ve pulled back both the existing Contact ID and the existing Organisation ID to demonstrate this. I’ve used the unique field email address for the contact. You can use a concatenation of first name and last name too, pretty much anything that is unique. I suggest you avoid using single names as this could lead to matching issues. Make sure the file for importing is saved as a CSV.
Step 2
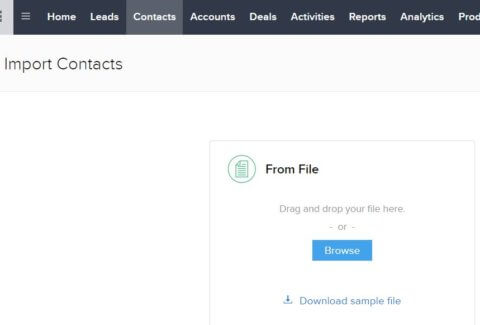
Go to the module you want to import data into and select the Import button in the top right. I’ll be importing the Contacts.

It will take you to an import file page. Browse to the file to add it and select Next.
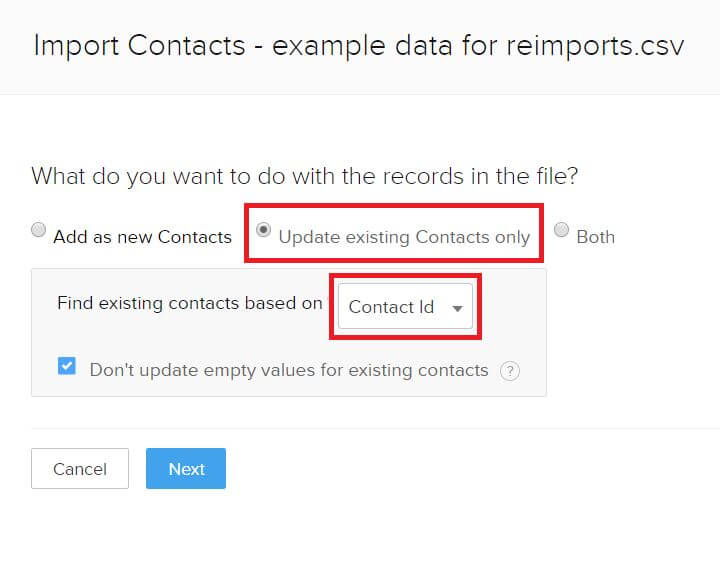
Step 3
Select Update Existing Contacts Only and find existing contacts using the Contacts ID. You have the choice also to use the email address, however, you may not always have the email address for all the records.
It’s a good idea to avoid update existing fields in your CRM with blank values from your spreadsheet, unless that is what you want to do. Tick the box to avoid overwriting the data. Then select Next.
Step 4
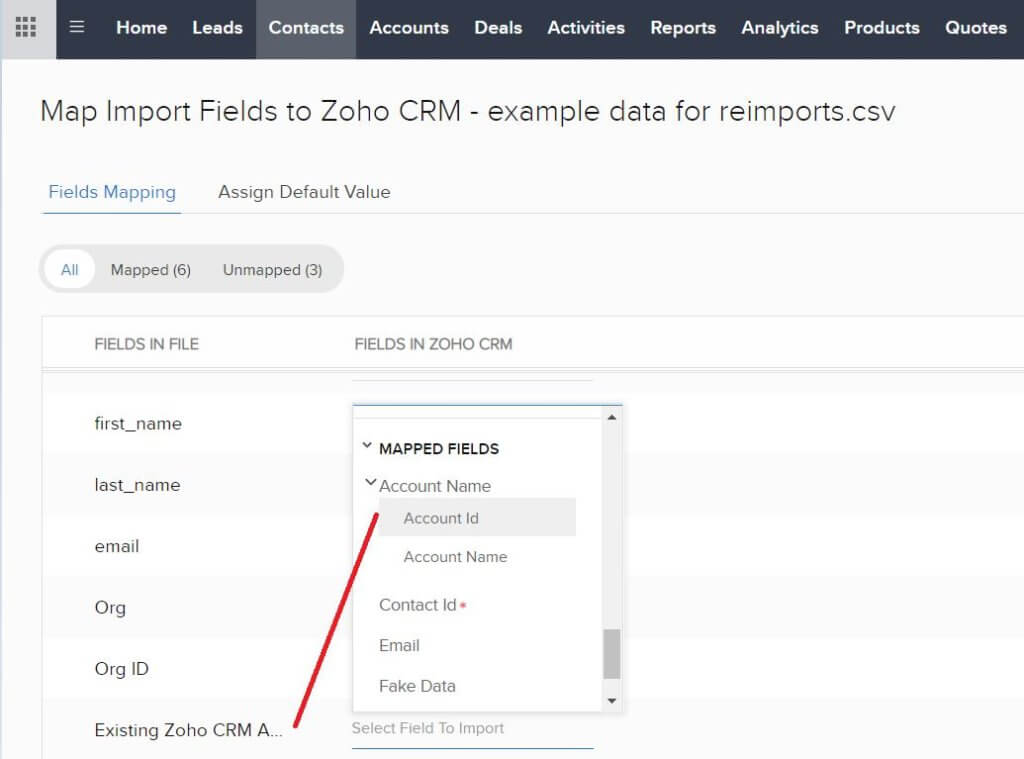
We now get to map the fields. You’ll recognise this page as it’s very similar to the migration page. Match up the fields in your imported spreadsheet with the CRM fields.
In my example, I’m importing Contacts back into the CRM. This means that I’ll need to use the existing Zoho CRM Contacts ID, which begins with ZCRM. I got this using a VLookup, and we need to use this to match the imported spreadsheet records back to the Zoho CRM records.
You’ll notice that when linking the Contacts to the Organisations / Accounts, there’s an option to use Account name or Account ID. It’s safer to use the Account ID (found using VLookups) as there could be duplicate Accounts in your CRM. You should minimise and eliminate duplicate records in the CRM.
Use the two columns on the right to see data from your import file to make sure you’re mapping them correctly. You can also assign default values to fields as well. Don’t create new fields from the import wizard. This should be done with care in the Modules and Fields Customisation. Once all your fields are mapped, press Next. You may get a popup telling you that not all the fields in your spreadsheet are mapped to fields in the CRM. In a lot of cases, this is fine as we can choose what fields to map and what to ignore.
Step 5
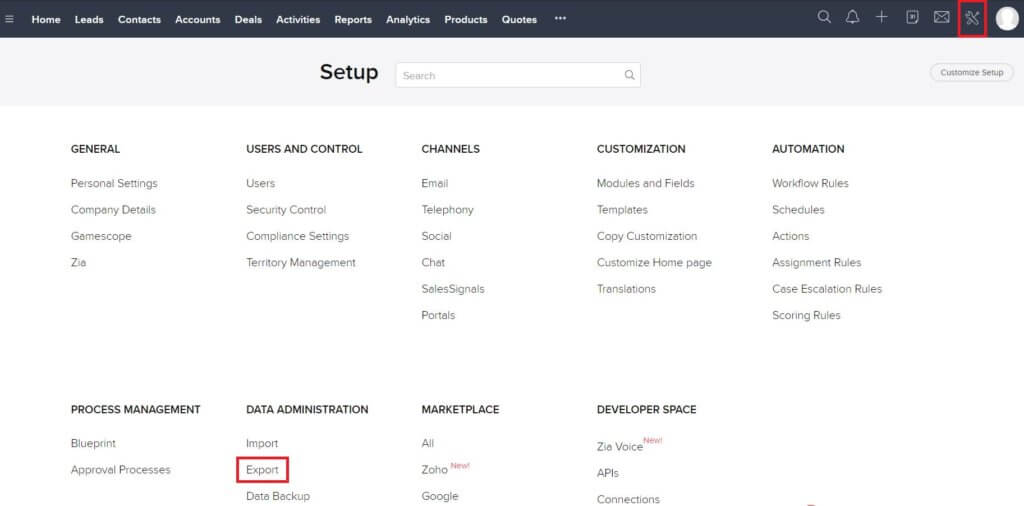
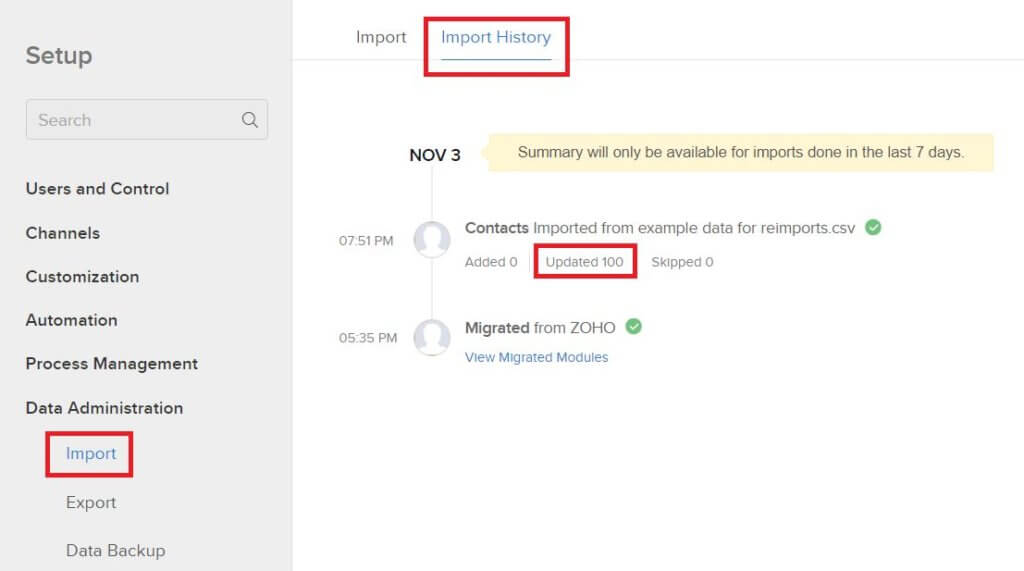
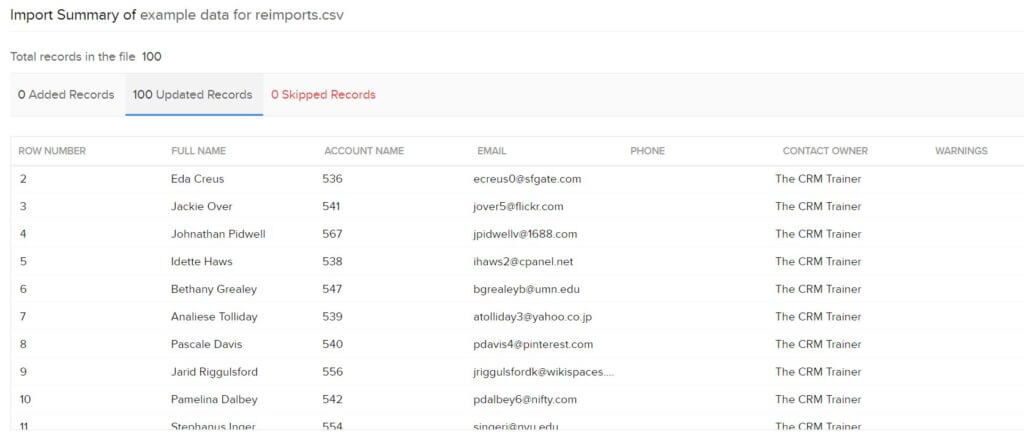
The CRM then informs you that your import is scheduled and you’ll be notified once it is complete. If you want to see the status of this import, go to Settings and select Data Administration and then Import, there you can find the Import history. Select it to find more information if any records were skipped and not imported.
Summary
When importing records into Zoho CRM, you should consider whether it’s new data, you’re updating existing data, or adding new child records to existing data. It’s straightforward to import data into Zoho CRM as long as you understand that every record you import should have an ID field. You can obtain the IDs from other spreadsheets exported from the CRM or made up IDs if you’re adding new records. Use vLookups to link the IDs together for your imports.
The cost of failing to back up business data can be huge but fortunately, Zoho backups are covered as part of your service. The data migration and Zoho CRM data import wizards are very easy to use and take you through the process to minimise the chance of going wrong. However, if you do make a mistake during the import process, you can always undo your import. However, this is only for adding records.?
You can’t undo updated records, but you can see the history log of each record to see what the values used to be.